If you’re in the jewelry industry, whether as a casting house, brand owner, or supplier, knowing how jewelry gets made isn’t optional. It’s essential. Understanding the full jewelry manufacturing process helps you plan better, reduce errors, and work more effectively with production partners.
Here, we break down the modern manufacturing process step-by-step—what actually happens from design to delivery.
Jewelry Manufacturing Process Step By Step
Here’s a breakdown of the full jewelry manufacturing process, from concept to final polish.
1. Design & CAD Modeling: Where Every Piece Begins
Every piece starts as an idea—but an idea isn’t enough. The real process starts with CAD (Computer-Aided Design).
CAD models are digital blueprints. They define:
- Exact dimensions
- Stone sizes and positions
- Prong placement
- Wall thickness and tolerances
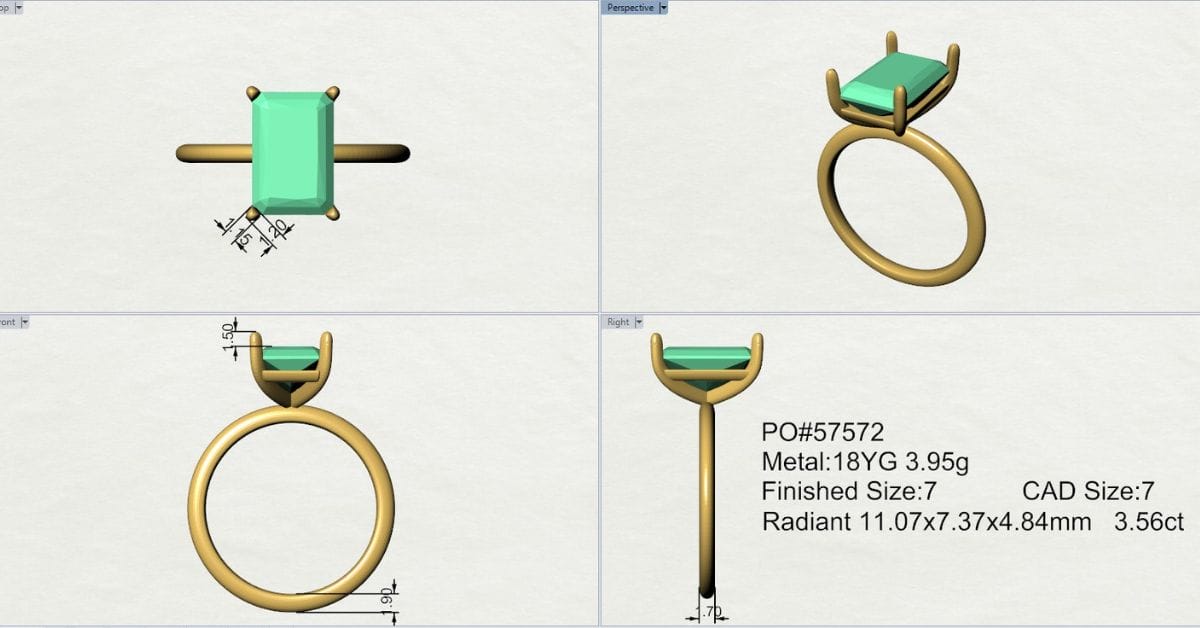
A good CAD file saves you from poor casting, flawed setting, and rework later. It also makes 3D printing possible.
At Sarkissian Studio, our CAD team builds production-ready files that are optimized for clean casting, strong prongs, and real-world manufacturing—not just pretty renders.
2. 3D Printing or Wax Carving: Turning the Digital into Physical
Once your CAD file is approved, the model is printed or milled in wax or resin. This becomes your physical prototype.
There are two methods:
- 3D printing: Fast, highly accurate for most commercial jobs
- Wax milling: Used for high-resolution models or special materials
This wax model will be used to create your casting mold.
3. Treeing: Preparing for Mass Casting
Wax models are attached to a central wax stem (called a “tree”). This allows multiple pieces to be cast at once.
- Light items go at the top
- Heavy pieces are fixed lower for balance
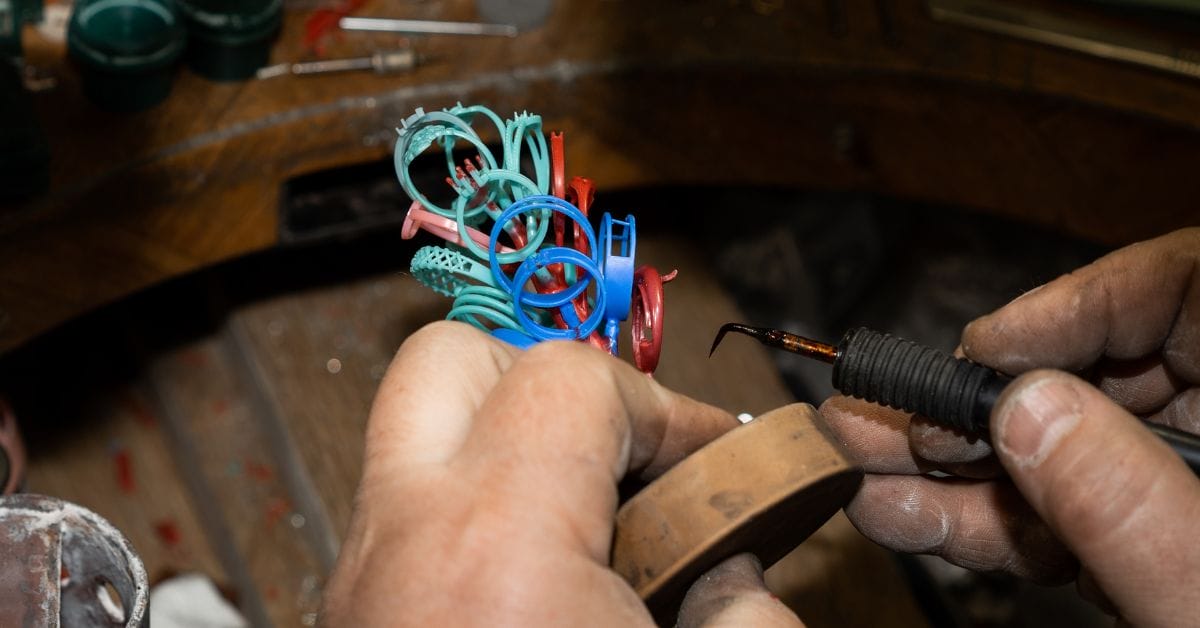
This step maximizes casting efficiency and material use.
4. Investment Casting: The Core Manufacturing Step
This is where molten metal meets your design—and it’s one of the most critical phases of jewelry production. Lost wax casting is the industry standard for fine jewelry. It allows jewelers to capture highly detailed designs and replicate them in precious metals with consistency.
Step-by-step:
- The wax tree is secured inside a steel flask
- Investment plaster (a fine, heat-resistant material) is poured in, fully surrounding the tree
- The flask is heated in a kiln, melting out the wax and leaving a negative cavity
- Molten metal (like gold, silver, or platinum) is poured into that cavity using centrifugal or vacuum casting
- After cooling, the hardened investment is broken away, revealing the raw metal forms

This stage demands precision. Any temperature variation, poor wax burnout, or metal flow issue can result in porosity, miscasts, or surface defects. It’s not just about pouring metal—it’s about controlling how it cools, flows, and fills the finest parts of your design.
5. Cleaning, Filing & Assembly
Once the raw casting is complete, the piece still needs significant cleanup.
Here’s what happens:
- Sprues (the channels where the metal flowed in) are cut off
- Edges are filed and refined to remove seams or rough spots
- Assembly tasks like soldering bails, earring posts, or ring shanks take place here
This is also where parts like clasps, hinges, or stone heads are joined—turning cast components into wearable jewelry. Tools like micromotors, burrs, and needle files are used to achieve clean joins and consistent shaping.
At this stage, the piece begins to take its final form—but it still needs visual refinement before stones can be set.
6. Pre-Polishing: Preparing Surfaces for Stones
Before gemstones are set, the metal needs to be pre-polished. Why? Because once stones are mounted, many surfaces will be inaccessible.
Key steps include:
- Tumbling with ceramic or steel media to smooth small items
- Hand polishing with buffs or brushes for larger areas
- Ultrasonic cleaning to remove dust and polishing residue
Neglecting this step often leads to dull patches beneath stones or poor contact between the metal and the gem, which can compromise both appearance and durability.
Pre-polishing ensures a bright, clean surface—setting the stage for a professional, high-end finish.
7. Stone Setting: Precision Work Begins
This is where craftsmanship meets engineering. Gemstones are set by hand using microscopes and precision tools.
Common setting styles:
- Prong setting
- Bezel setting
- Pave and micro pave
- Channel setting
- Flush or gypsy setting
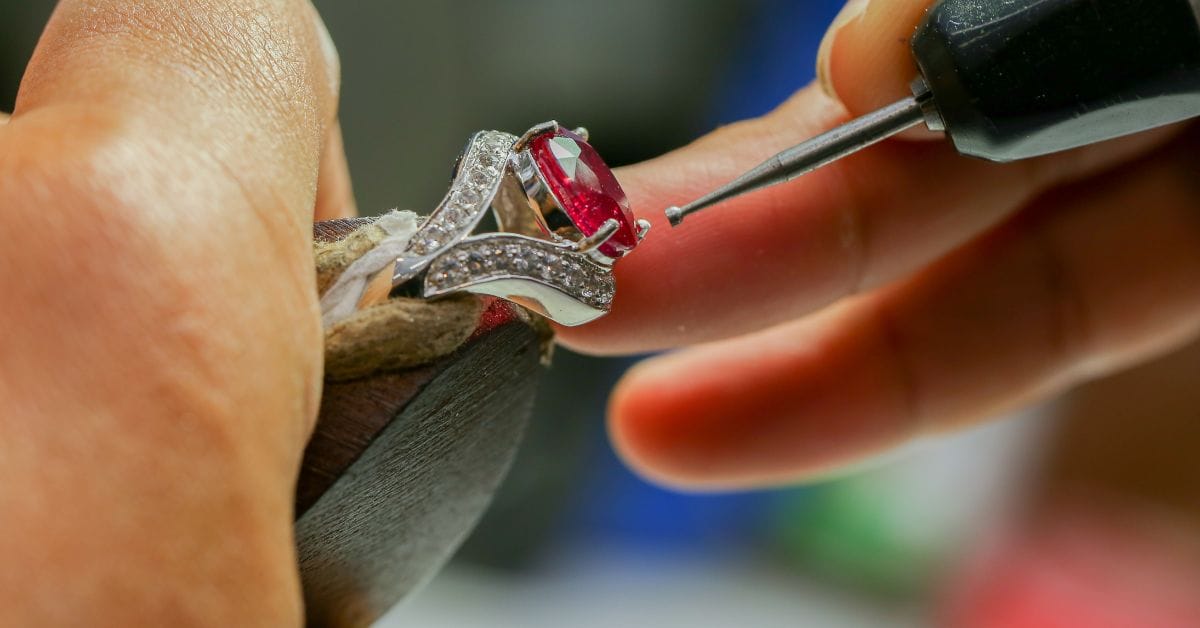
Each method requires careful attention to seat alignment, girdle support, and clean finishing.
8. Final Polishing & Finishing
Once all stones are set, the entire piece is polished to a high shine or desired finish:
- Mirror polish: High luster
- Matte or satin finish: Soft, non-reflective
- Sandblasting: Even, textured surface
Manual polishing wheels or automated tumblers are used depending on the piece.
9. Plating (If Needed)
Many white gold or silver pieces undergo rhodium plating for brightness and tarnish resistance.
- The piece is cleaned
- Submerged in rhodium solution
- Electrified for uniform bonding
This step is optional but expected in commercial production.
10. Quality Control: Final Checks Before Delivery
Nothing ships without QC.
Every piece is checked for:
- Loose stones
- Scratches or rough edges
- Correct dimensions
- Secure solder joints
Overlooked but Critical Steps in Jewelry Manufacturing
- Material Testing: XRF analysis and fire assay are often used before casting to ensure alloy purity
- Tolerance Planning: Shrinkage during casting affects prong tightness and setting fit
- Rubber Molds: For repeat orders, rubber or silicone molds are made from master models for quick re-casting
These are real-world factors that affect yield, finish quality, and delivery times.
Why the Manufacturing Process Matters
If you’re a casting house, retailer, or brand, every step of this process affects your bottom line.
- Bad CAD leads to poor castings
- Weak polishing slows down setting
- Missing QC causes returns
Knowing the process isn’t just helpful—it protects your time and your reputation.
Sarkissian supports every stage of this process by providing CAD, rendering, and 3D Jewelry animation services built for real production environments. We know what casting houses need, because we work like one.
If you need files that cast clean, visuals that sell, or support that scales—we’re ready.
Conclusion
The jewelry manufacturing process is a mix of art, engineering, and precision. Every step—starting from CAD design—plays a role in how your final piece turns out. If one link in the chain fails, the whole job slows down or falls apart.
Understanding how jewelry is made helps you make smarter decisions, avoid costly mistakes, and build stronger relationships with your production partners.
And when you’re ready to work with a team that knows how to make things easier, faster, and more consistent—we’re here to help.
FAQs
- What is the jewelry manufacturing process?
It’s the step-by-step production of a jewelry piece, starting from CAD design, through casting, polishing, setting, and final inspection. - How long does jewelry manufacturing take?
Timelines vary, but a standard piece can take 5–10 business days from CAD to completion. Complex or custom pieces may take longer. - What materials are used in jewelry casting?
Common metals include gold, silver, platinum, and brass. Gemstones, diamonds, and synthetic stones are added during the setting phase. - Why is CAD important in manufacturing?
CAD files serve as the foundation for every step after. A well-built CAD model reduces casting flaws, improves stone setting, and speeds up production. - Do I need to understand the full process if I only sell jewelry?
Yes. The more you understand the steps, the better you can communicate with your manufacturer, avoid delays, and ensure consistent quality.
